Partitioning your hard drive can be a frustrating and daunting task. However, once you understand how the process works, it’s a lot less scary. So why should you partition a drive?
When I was in college, like many other students, I had a MacBook Pro for its ease of use and its minimalist aesthetic. I did not think that some applications I needed for school were not compatible with the Mac. At that moment I thought about partitioning my disk so that I could run Windows on Mac.
Also, I had an external hard drive that I wanted to be able to use with both OS X and Windows. In this article, I will walk you through the steps to partition internal and external hard drives on a Mac.
Before you start, make sure you back up your entire Mac computer using Time Machine. Even if you don’t mess up anything, it’s very likely that the operating system will mess up and break your system.
Partition the external drive
If you have a large external hard drive, you can easily partition it so that the entire drive is used. I was using an external 1.5TB drive with my Mac, but never used more than 1/4 of the space.
Instead, here’s how I ended up partitioning my drive, which ended up making it much more useful:
- 33%: Mac (additional storage space) – 500 GB
- 33%: Mac (Backup Time Machine) – 500 GB
- 33%: Windows (extra storage and backup can go on the same partition) – 500 GB
As you can see, each partition can have its own file format. If you have an even bigger drive, you can create even more partitions for other operating systems like Linux, etc.
To partition the drive, go to Spotlight at the top of your MacBook screen (notification bar) and type Disk utility.

On the left hand side, go to the tab that says EXTERNAL.

Yours will look a little different than mine. Under the External going to the left side, you should have one hard drive instead of 3 (I have already partitioned mine). Switch to that external hard drive and partition it according to your needs.
NOTE: If your external hard drive is not formatted for Mac OS, you may need to do it first Initialize it and then To delete it. It is very easy:
- In the external tab on the left side, select the drive you want to use.
- Then select the To delete top option
- Once there, give it a name and format it Mac OS Extended (Journaled)
- For the schemeyou can choose from GUIDE, MBR or Apple. If you’re using the drive for storage only, it doesn’t matter which one you choose. However, if you plan to boot from the drive, you should choose MBR for Windows and Linux and GUID for OS X. If you plan to use the drive for Boot Camp, you should also choose GUID.

Note that you can also click Security options and choose between different levels of security. By default, OS X will use the faster method, which does not wipe the drive securely. If you move the slider to More secure, it will meet the DOD standard for erasing data by overwriting the data 7 times. This will prevent anyone or any software from recovering previously written data from the drive.

OS X may ask if you want to use the drive for Time Machine backups, but you should choose Decide later unless you want to use the entire drive for backups. You are now ready to partition the external drive!
Go to the top where it has the options: First Aid, Partition, Erase, Restore, Mount, etc. Select Partition and create partitions according to your specific needs. In my case, I chose a size of 500GB, which is a third of the drive.

Select how you want to partition the drive (refer to my percentages, as that’s what I used in the screenshots here), select To apply, and then click Partition. After that, it will take a few minutes to partition, so be patient!

When finished you should see the green check mark next to the drive and it should say Mission accomplished. Now select Done and you are done with the first partition.

Now to partition the rest of the space, click Without title under External and then click Partition still.

Name the partition, choose a size and choose the format. Since this will be for Windows storage, I have chosen MS-DOS (FAT). You can also choose exFAT if you like it because it is compatible with both Windows and Mac.
Partition the indoor unit
Partitioning an internal hard drive is pretty much the same in terms of the steps to follow, but it is slightly different in the way it is implemented.
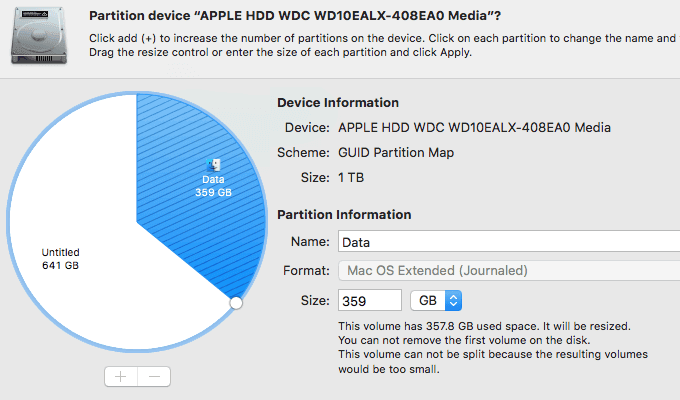
Since you already have OS X installed on your internal drive, when you click Partition and choose a size, you will notice that you cannot create a partition smaller than the amount of space already used on the drive.

My internal drive was already using 359GB of space, so when I typed 200GB, it automatically changed it to 359GB and displayed a message stating that the first volume cannot be removed and the volume cannot be split because the resulting volumes would be too small.
So if you want to create an additional partition, the first thing is to create a partition that includes OS X and gives you additional space for installing programs, etc. Below, I left the name Macintosh HD and created the 500GB partition. This means that the partition where OS X is installed has approximately 140GB of space for additional data.
Basically, we’re just shrinking the original partition, which took up the entire disk into something smaller. Then we partition the free space to our liking.

As you can see, I created the original 500GB partition instead of 1TB, which frees up 500GB on the disk for creating other partitions. As with the external hard drive, once the partition is created, click Without titlebut this time under the Internal header and click Partition.
This is basically all you need to partition drives in OS X. Hopefully, it worked for you. Have a good time!