Connecting your Mac to a local or remote server allows you to access all the files available on that particular server. macOS by default has a connect to server feature that allows you to connect your Mac to any server without any restrictions. It then appears as a normal disk drive in the Finder that you can access, work with, and even delete files from it.
There are several ways to mount a server as storage on your machine. You can do this using the native feature built into macOS, and you can even use a third-party app to access your servers on your Mac.
How to connect to a server on a Mac using the Finder
Using the Finder to connect to a server is the fastest and easiest way to accomplish the task. All you have to do is launch an option on your Mac, enter your server details and you are good to go.
Please have your server login details handy as you will need them in the steps below.
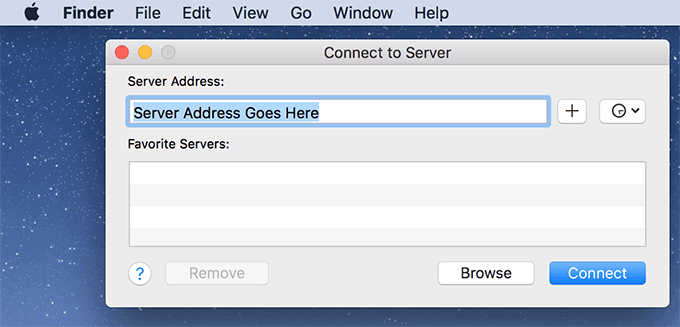
- Open a Finder window on your Mac. The easiest way to do this is to go to yours Desktop and you will be inside a Finder window.
- Click on to go menu at the top of the window and select the option that says Connect to the server. Alternatively, press the Command + K keyboard shortcut.


- A message will appear asking you to enter your login details. Enter the details and it will connect you to the server.
Once connected, your server will appear as a normal disk drive on your Mac. You can double-click on this driver to access its contents and even add new files from your Mac.
When you are done playing with the server, you may want to disconnect from it. You can do this by right-clicking on the server and selecting the Expel option.

It will be removed from the Finder on your Mac.
How to connect to recent servers on a Mac
When you connect to a server on a Mac using the Finder, your Mac saves the server name on your system. This is to help you connect to it later without having to re-enter the server details.
Searching for and connecting to recent servers on a Mac can be done in two ways.
Use the Apple menu to connect to a server on a Mac
The Apple menu on your Mac allows you to open items you have recently accessed and this includes your servers as well.
- Click the Apple logo in the upper left corner of the screen, select the Recent items option and you will find all your recently connected servers in the list.

- Click on any of the servers and you will be connected to them.
Use the Connect to Server menu to connect to a recent server
Another way to find and connect to a recent server is to use the same menu that was used in the first place to connect.
- Enter a Finder window, click to go top menu and select the Connect to the server option.
- There will be an icon that looks like a time machine. Click on it and you will see the list of your recent servers. Select the server you want to connect and your Mac will connect to it.

Use AppleScript to connect a Mac to a server
AppleScript also has a feature that allows you to connect your Mac to a server from your code. It’s a single line code that tells the Finder to open the specified server on your machine.
- Click on Springboard in the Dock, search Screenplay Editorand click on it when it appears on the screen.

- Click on File top menu and select New to create a new script in the app.


- Click on script top menu and select Run to test your script and to see if it connects to your chosen server.


- On the next screen, select the server type, enter the server address, type your login details and click Connect.

If you will also connect to this server in the future, be sure to check this Add to Keychain so your login details are filled in automatically the next time you connect to it.