Taking screenshots on a Mac is extremely simple thanks to the amazing screen capture utility with which it comes preloaded. The utility includes even more features than what you find or see at first glance.
Unleashing these extra options will allow you to capture your screenshots in a more personalized way. These are pretty simple tweaks to apply to the utility to capture the type of screenshot you want on your Mac.


To take a full screen screenshot, simply press Command + Shift + 3 at the same time on your Mac keyboard. The screenshot will be captured and saved on the desktop.
Take a screenshot of a selected window
Sometimes you may want to only capture a certain part or window of an app on the screen. While you can always take a full size screenshot and crop it to get the result you want, there is a better way to do it in Mac.

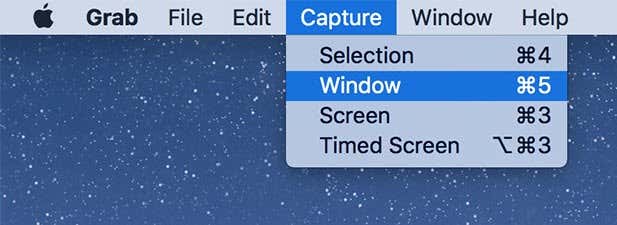
While you have the app window you want to capture open on your screen, press the key Command + Shift + 4 key combination, press the key Space barand click the app window to capture it.
Take a screenshot of a selected area
There will be times when you may want to take a screenshot of a particular area (not a specific window) on the screen. It is different from capturing the entire screen or a specific app window.
You can do this with a key combination on your Mac. From any screen, press the key Command + Shift + 4 keys at the same time, drag the marker and select the area you want to capture, then release the marker. Your screenshot has been captured.
Take a timed screenshot
Sometimes you will run into this problem. You want to take a screenshot, but the screen also requires you to use the keyboard and mouse at the same time. If you use the keyboard to take the screenshot, you cannot use it with the app that requires it.
There is a workaround, though. The Mac has the ability to take timed screenshots thanks to the built-in Prey utility.

Start the Prey app from the Launchpad on your Mac.


A dialog box will appear telling you that a screen will be taken after ten seconds have passed. Click on Start timer button to start the timer
After ten seconds have passed, it will automatically take a full screen screenshot of the screen and save it to your desktop.
Remove drop shadows from screenshots
If you’ve noticed, the app window screenshots you take on your Mac come with drop shadows. While these make your screenshot interesting, sometimes you may not want to include them in your images.

Removing drop shadows from your Mac screenshots is quite simple and can be done using a command in the Terminal app.
Start the terminal app on your Mac.
Type the following command in the Terminal window and press log into.
defaults write com.apple.screencapture disable-shadow -bool true ; killall SystemUIServer

From now on, no drop shadows will be added to any screenshots you take.
If you want to restore drop shadows, simply run the following command in the Terminal app on your Mac.
defaults write com.apple.screencapture disable-shadow -bool false ; killall SystemUIServer

Drop shadows should now be back on your Mac.
Show cursors in your screenshots
Most screenshots you find on the internet usually don’t have mouse cursors included. However, if you want to emphasize some things in your screenshots, you may want to include them.
The default capture utility on your Mac doesn’t include cursors. However, you can use the built-in Grab app to get the task done.
Open the Prey app from the Launchpad on your Mac.


You will now see various types of pointers that you can use in your screenshots. Select the one you like and exit the panel.


While on your Mac’s login screen, simply press the key Command + Shift + 3
key combination and will capture and save the current screen on the desktop. You can then log back into your account to view your screenshot.
Take a screenshot of your Touch Bar
You can also take screenshots of your Mac Touch Bar so you can show your audience what it looks like.

To do this, just press the button Command + Shift + 6 key combination on your Mac keyboard. A screenshot of your Touch Bar will be captured and saved on your machine.
Change the name of the default screenshot file
You may have noticed that your screenshots are saved with the default name “Screen Shot” on your Mac. However, you have the option to change the name if you wish.
Start the terminal app on your Mac and run the following command inside it. Be sure to replace FIRST NAME with the new name you want for your screenshots.
defaults write com.apple.screencapture name "NAME"; killall SystemUIServer

Your future screenshots will use the name you have chosen as filenames.
Get rid of timestamps from screenshots
Your Mac adds the time and date you take screenshots to the filenames. If this makes the image names too long for you and you prefer simpler names, you can remove this information.
Open the terminal
app on your Mac and run the following command.
defaults write com.apple.screencapture "include-date" 0; killall SystemUIServer

It will remove timestamps from screenshot filenames. If you’d like to get them back, run the same command by replacing 0 with 1 in the Terminal and will undo the changes made.
Change the save location for your screenshots
By default, all your screenshots are saved on the desktop. This also means that your desktop will be cluttered if you take a lot of screenshots and don’t arrange them in the appropriate folders.
However, you can change the default screenshot save folder, so that screen captures are saved in the folder of your choice.
Run the following command in place of the terminal PATHWAY with the path to the folder where you want to save the screenshots.
defaults write com.apple.screencapture location ~PATH; killall SystemUIServer

You can always restore the default save folder by running the following command:
defaults write com.apple.screencapture location ~/Desktop; killall SystemUIServer
Change the screenshot image format
PNG is the default file format for your screenshots. However, if you need your screenshots in another format, you can change the default screenshot format from the Terminal.
Use the following command in Terminal to do this. Substitute jpg with the image format in which you want to insert your screenshots. Some of the formats you can use are JPG, GIF, PDF, PNG, and TIFF.
defaults write com.apple.screencapture type jpg;killall SystemUIServer

You can switch back to the default file format using the same command.