The MacBook Pro is a very powerful laptop; one that can boost your productivity many times over. But it can also be a bit tricky, especially if you’re used to working in a Windows environment. In this article, we’ve put together 10 helpful tips that will speed up your familiarity with this sleek and cutting-edge aluminum block.
Note: We are currently using a 2018 model with macOS High Sierra for this article, so there may be some features that are not accessible if you are using an older MBP model or an older version of macOS.

Also, we made a video on our YouTube channel that covers some of the main points below. Make sure you check it out.
1. Work faster with multi-touch gestures
The first thing you’ll want to familiarize yourself with is that huge, smooth-to-the-touch trackpad. There’s a reason why the MacBook Pro trackpad is so big and why it’s so different from other laptop trackpads.
It can actually support multi-touch gestures, just like your smartphone or tablet. Yes, there are now several Windows 10 laptops that can do this, but MacBook Pros have supported multi-touch for many years, and the implementation is just plain better.
Let’s put multi-touch into action right away. Using the trackpad, place the mouse pointer over any unselectable object in this article (try with whitespace). Now bring your thumb and forefinger together (while tapping the pad) and then expand just like you would to zoom in on an image on your smartphone.
Notice how everything expands as you zoom in (because you are). She returns everything to its original size by making a pinching gesture.

You can also achieve almost the same effect by double tapping the non-clickable space on the page at the same time using two fingers. This should enlarge the page. Zoom out by double tapping with two fingers again.

You can learn (as well as configure) more touchpad gestures by navigating to Apple menu> System Preferences.

Then click Trackpad.

You should then see Point and click, Scroll and zoomAnd More gestures tabs at the top.
2. Let Siri do some activities for you
Even if you’re new to the Apple ecosystem, you’ve probably already heard of Siri, the virtual assistant who answers questions and even performs some tasks for you. Siri debuted on the iPhone, but has now found its way to iPad and other Apple devices, including the Mac.
You can access Siri by clicking on its icon in the upper right corner of the screen.

Once launched, Siri can begin answering questions / requests, such as:
- Show my Downloads folder
- Make the screen brighter
- How fast is my Mac?
- FaceTime Bob
- What’s the weather like tomorrow?
- And so on
Siri uses artificial intelligence (AI) which allows it to learn more as you continue to use it. Once he gets the hang of it, he can really help you do more things.
3. The delete key is not broken
On a Windows keyboard, when you want to use the Delete to delete a character, normally place the cursor to the left of that character and press the key Delete key. Oddly, if you did this on a MacBook Pro keyboard, the cursor will simply move to the left.
Worse still, if a character is to the left of the cursor, that character will be eliminated, just as you would expect if you did this with a Windows Backspace key.
Sounds counterintuitive, right? Well, if you’re used to Windows, it sure is. To achieve the same effect as Windows Delete button, just press fn + Delete. Once you get used to it, it won’t be so counterintuitive anymore.

4. Right click = single tap with 2 fingers
The right-click functionality is one of the most useful features of Windows, allowing you to launch context menus that show the choices you need at a certain time or context. Unfortunately, that feature isn’t available by default on your MacBook Pro. Nothing happens if you try to right-click on the trackpad.
But do not worry. The Mac equivalent of the right mouse button is just as easy. Remember that two-finger double tap we taught you earlier? Well, if you reduce it to just one tap, you can get the same effect as a right click. Try it. Tap once with two fingers while the cursor is positioned on this item. You should immediately see a context menu popping up as soon as you perform the gesture.
Also, be sure to check out my other article on more Mac equivalents to Windows programs.

5. Taking screenshots
Sometimes, you may want to take screenshots for use in a document or presentation. To take screenshots on your Mac, you can do one of the following:
- To capture the entire screen, press Command + Shift + 3
- To capture a portion of the screen, press Command + Shift + 4, then, when a crosshair appears, tap and drag the crosshair over the area you want to capture. Once you’ve covered the area you want to capture, release. Easy as pie.

Normally, your images will be stored on the desktop. However, if you have a screen capture tool like Snagit, the images will usually be pasted there. Check out my more detailed post on More Keyboard Shortcuts in OS X.
6. Connect multiple devices using Thunderbolt
So far, we’ve focused on the things you see on the screen. Let’s move somewhere else on your MacBook Pro’s unibody. Look at the side, especially that peculiarly shaped power jack. Apple hasn’t modeled that jack to simply resemble the Thunderbolt port next door. It is a Thunderbolt port. Both ports are exactly the same.

So, you can actually charge your laptop through one of these ports, and you can plug any compatible device (e.g. an external drive, external monitor, external microphone, etc.) into either.
Having a Thunderbolt port as a power jack can come in handy, especially if you’re using the smaller 13-inch MacBook Pro, which comes with only 2 Thunderbolt ports. For example, let’s say you want to record audio via an external microphone AND still have an external monitor for viewing – your script for example – while ALSO using the home screen to view an application.
To do this on a 13-inch MacBook Pro, you can temporarily unplug the power cord, plug one of the devices into its place, and then plug the other device into the other port. MacBook Pros have a long battery life, so you can get a lot of work done even with the MBP disconnected.
7. Bring the Emojis!
If you’re a Millennial or Gen Z or just anyone who likes to express through emoticons, frowns and the like, you’ll be happy to know that your MacBook Pro has a hotkey for launching Apple’s vast collection of emojis. Just press Ctrl + Command + Space. This should bring out this:

Most applications allow you to simply tap on an emoji to use it. For others, you may need to drag the emoji into place.
8. Search quickly with Spotlight
Normally, when we want to search for something on the web, we launch our favorite web browser and then type our search into the search bar. So, if we want to search for a file (in Windows), we open Explorer or go to the Start menu and search there.
macOS brings all search capabilities together in one place. You can perform all searches in Spotlight. To launch Spotlight, simply press Command + Space. This should launch the Spotlight search bar, where you can then enter anything you want to search, be it a file on your file system or something on the web.

If you can’t find the file you’re looking for but are 100% sure it’s on your system, you probably just need to re-index the drive. But this is for another post, so stay tuned for that one.
9. Work more efficiently with split screens
Power users usually have 2 or more external monitors to work more efficiently. With 2 or more screens, you can easily:
- Compare documents,
- Use one screen as your main workspace and another to view references,
- Use one screen for editing and another for viewing the outputs,
- And so on.
But what if you don’t have any external monitors? Well, you can always split a screen in two. To achieve this, you first need to set up the two apps you want to put next to each other Full screen modality. Just tap on that green circle in the top left corner of each app.

Once the two apps are in full screen mode, press the key F3 button to enter Mission control mode as shown below. As soon as you are in Mission Control, place the two apps / desktops next to each other. If you don’t see apps / desktops in the top row, place your mouse pointer in that area.
Once the two apps are next to each other, drag the app on the right to the left until it overlaps the one on the left. Publication.

Once they are hooked together, tap on the desktop that encloses the two apps. You should then see your two apps in split screen mode just like the one shown below.

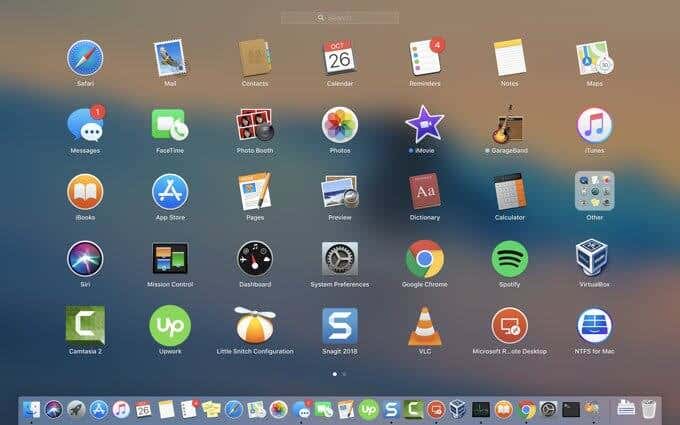
10. Where can I find all my apps?
Speaking of apps, we conclude this article by showing you where you can find apps in your MacBook Pro. The long way is to launch the seeker and go to Applications.
But if you want a faster way, click on the gray icon with the rocket in the dock. This should bring out Springboard. Swipe sideways by sliding two fingers horizontally on the trackpad and tap an icon to select an app.
You can also assign a keyboard shortcut to LaunchPad by going to System Preferences – Keyboard – Shortcuts – LaunchPad and Dock. Another good option for quick access to your apps is to go to Finder and drag the entire Applications folder to the dock.

When you click that icon now, it will load all your apps right from the dock.

That’s it for this article. I hope you enjoyed it! We’ll be writing more in-depth guides on how to get more out of your Mac soon.